Open vs closed clippers is one of the first things beginners need to understand when learning how to cut hair. The taper lever changes the cutting length, helping barbers blend hair, remove visible lines, and create cleaner fades.
If you have watched a barber move a small lever on the side of a clipper, you have seen this technique in action. That lever lets the barber make small cutting adjustments without changing the guard.
Understanding open and closed clippers can help you avoid cutting hair too short, improve your blending technique, and achieve a more even haircut at home or in a barbershop.
Table of Contents
Key Takeaways
Open and closed clipper settings control how closely the blades cut hair. Learning when to use each setting helps you create smoother transitions and more controlled fades.
- Open clippers: Generally leave hair longer.
- Closed clippers: Generally cut hair shorter.
- Taper lever: Adjusts cutting length without changing the guard.
- Half-open lever: Provides an intermediate cutting length.
- Clipper guards: Control the general hair length, while the lever fine-tunes it.
- Best fading technique: Combine different lever positions with suitable guards and controlled strokes.
What Is the Difference Between Open and Closed Clippers?
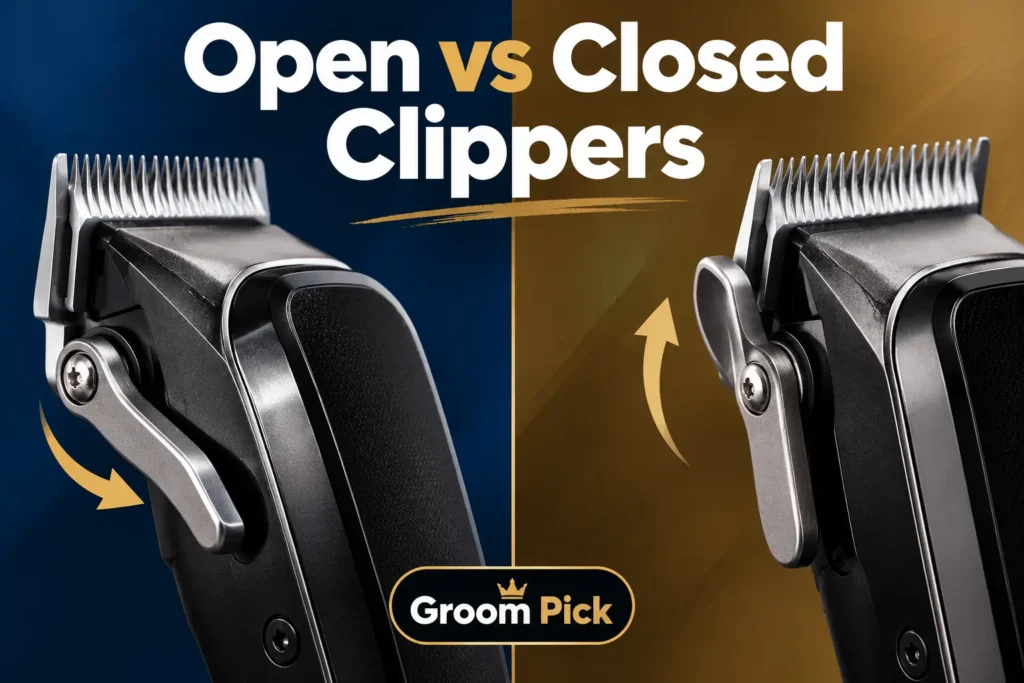
Open clippers leave more hair, while closed clippers cut closer to the scalp when using the same blade and guard. The difference comes from the position of the taper lever.
| Feature | Open Clippers | Closed Clippers |
|---|---|---|
| Hair length | Longer | Shorter |
| Cutting action | Less close | Closer |
| Lever position | Usually down or away from the closed position | Usually up or toward the closed position |
| Main purpose | Blending longer sections | Creating shorter sections |
| Common use | Softening transition lines | Refining lower guidelines |
| Best approach | Use controlled strokes to preserve length | Use carefully to avoid cutting too much |
Lever direction can vary by clipper model, so check the manufacturer’s instructions if you are unsure which position is open.
How Does a Clipper Taper Lever Work?
A taper lever is a small adjustable control on the side of many hair clippers. It changes the position of the moving blade relative to the stationary blade, allowing you to adjust the cutting length.
Open Lever Position
When the lever is open, the clipper generally leaves more hair behind.
Use this setting when you want to:
- Blend longer hair into shorter sections.
- Soften visible guidelines.
- Remove bulk without cutting too close.
- Create a gradual transition in a fade.
- Reduce the risk of removing too much hair in one pass.
For example, if the lower section of a fade looks much shorter than the section above it, an open setting can help you blend the transition while preserving some length.
Closed Lever Position
When the lever is closed, the clipper generally cuts closer to the scalp.
This setting is useful when you want to:
- Create a short baseline.
- Clean up the lower part of a fade.
- Refine a guideline.
- Cut hair closer around the neckline.
- Remove small amounts of excess length in a transition area.
A closed lever does not automatically remove every line. Your cutting angle, guard choice, and stroke technique also affect the result.
Half-Open Lever Position
A half-open lever creates a cutting length between the fully open and fully closed settings. This gives you more control when blending two different hair lengths.
For example, you can use a closed setting to establish a short section, open the lever to leave more length above it, and use a middle position to blend the transition.
These small adjustments help create a smoother fade without constantly switching guards.
Open vs Closed Clippers: Which Cuts Shorter?
Closed clippers cut shorter than open clippers when you use the same blade and guard. The difference depends on the clipper’s design and adjustment range.
Opening the lever generally increases the amount of hair left behind. Closing it generally reduces that amount.
Example of Clipper Guard Sizes
The following table shows common nominal guard lengths found in many clipper systems. Actual cutting results can vary by manufacturer and blade adjustment.
| Guard size | Approximate nominal length |
|---|---|
| No guard | Depends on blade and lever position |
| #0.5 | 1.5 mm |
| #1 | 3 mm |
| #1.5 | 4.5 mm |
| #2 | 6 mm |
| #3 | 10 mm |
| #4 | 13 mm |
Opening the lever generally leaves slightly more hair than the closed position with the same guard. However, the exact difference is not identical across all clipper models.
Example: Using a Number One Guard
Imagine you are cutting the sides of a haircut with a #1 guard.
- #1 closed: Leaves hair close to the guard’s nominal cutting length.
- #1 halfway open: Leaves a little more length.
- #1 fully open: Generally leaves the most length of these three settings.
Using these positions helps you blend the #1 guard into a shorter section without creating an obvious step.
How to Use Open and Closed Clippers for a Fade
A fade gradually transitions from short hair near the neckline and ears to longer hair higher on the head. The taper lever helps you control the small differences between these lengths.
Step 1: Prepare Your Hair Clippers
Start with clean, dry hair unless your clipper instructions recommend otherwise. Make sure the blades are clean, properly aligned, and ready to use.
Before cutting:
- Brush or comb the hair into position.
- Choose the guards you need.
- Check the clipper’s lever positions.
- Work in good lighting.
- Decide how high you want the fade to reach.
Beginners should practice on a mannequin or a suitable practice area before attempting a full fade.
Step 2: Create the First Guideline
Decide where you want the shortest part of the fade to sit. A low fade starts near the ears and neckline, a mid fade begins around the temples, and a high fade starts higher on the sides.
Use your intended short setting to create a controlled guideline. Avoid pushing it higher than planned because removing too much hair can make the fade difficult to correct.
Step 3: Open the Lever to Preserve Length
Work on the section above the first guideline using an appropriate guard and an open lever position.
Use short, controlled upward strokes. As you approach the top of each stroke, flick the clipper away from the scalp rather than pressing straight into the next section.
This helps soften the transition and prevents a hard line from forming.
Step 4: Close the Lever Gradually
If a dark line remains, adjust the lever toward the closed position as needed. Work directly over the line instead of cutting a large area unnecessarily.
Make a few light passes, inspect the result, and repeat only if needed. Closing the lever cuts shorter, so avoid removing too much hair from the surrounding section.
Step 5: Use Intermediate Lever Settings
If the line remains visible, try a halfway or nearly open position.
Small adjustments allow you to remove hair gradually. Use light, flicking strokes and check the blend from different angles before making more passes.
Step 6: Move to the Next Guard
Once the first transition looks smooth, move to the next guard size to blend the section above it.
For example, you might work from a no-guard setting to a #0.5 guard and then a #1 guard. The exact sequence depends on the desired haircut, the clipper model, and how much length you want to preserve.
Use the lever to fine-tune the transition between guard sizes.
Step 7: Check the Fade From Different Angles
Inspect both sides and the back of the head. A fade can look smooth from one angle but still show a dark line from another.
Use a mirror to check the back if you are cutting your own hair. Make small corrections and stop when the blend looks even.
When Should You Use Open vs Closed Clippers?
The best lever setting depends on the area you are cutting and the result you want. Open and closed positions work together to create different lengths and smoother transitions.
| Situation | Recommended setting | Reason |
|---|---|---|
| Creating a short baseline | Closed | Cuts closer to the scalp |
| Blending into longer hair | Open | Preserves more length |
| Removing a visible line | Adjust gradually | Targets the transition |
| Blending between guard sizes | Intermediate positions | Fine-tunes the length |
| Refining the lower fade | Closed, used carefully | Helps cut closer |
| Working on upper transition areas | Open with a suitable guard | Leaves more length |
| Correcting a small uneven area | Small lever adjustments | Reduces unnecessary cutting |
These are general guidelines rather than fixed rules. Hair texture, growth direction, head shape, and the desired fade all affect the best technique.
Clipper Guard Sizes and Taper Lever Settings
Clipper guards and taper levers work together to control cutting length. Guards provide the main length adjustment, while the lever helps fine-tune the result between settings.
For example, a #1 guard and an open lever generally leave more hair than the same guard with the lever closed. This can help blend the transition between a #1 guard and a shorter setting.
How Guards and Levers Work Together
- Use a shorter guard for shorter hair.
- Use a longer guard to preserve more length.
- Open the lever when you need to leave more hair.
- Close the lever when you need a closer cut.
- Use intermediate settings to blend transitions.
Avoid assuming that every guard and lever combination produces an exact, universal length. Different blade designs and clipper models can produce different results.
For more help with the cutting process, read this related guide on how to fade hair step by step. It explains guideline placement, guard progression, and blending techniques that work alongside taper lever adjustments.
Common Mistakes When Using Open and Closed Clippers
Many uneven fades happen because the barber removes too much hair too quickly or does not blend the transition between guard sizes. Understanding the common mistakes can help you avoid unnecessary corrections.
Closing the Lever Too Early
Closing the lever cuts closer, which can make a section shorter than intended.
How to avoid it: Start conservatively and close the lever only when you need a closer cut.
Using the Wrong Lever Direction
An open lever generally leaves more hair, while a closed lever cuts shorter. Confusing the two can make blending harder.
How to avoid it: Learn the positions on your clipper and check the manufacturer’s instructions.
Pressing Too Hard
Excessive pressure can remove more hair than expected and leave uneven patches.
How to avoid it: Use light pressure and flick outward at the end of each stroke.
Changing Guards Without Blending
Moving between guard sizes can leave visible lines if the transition is not blended.
How to avoid it: Use suitable intermediate lever settings and controlled strokes to soften the boundary between lengths.
Trying to Remove Every Line in One Pass
Some lines need several light passes, especially when hair grows in different directions.
How to avoid it: Work on one line at a time, adjust the lever gradually, and inspect the result before making another pass.
Ignoring Blade Maintenance
Hair buildup, poor lubrication, or incorrect blade alignment can affect cutting performance.
How to avoid it: Clean and maintain your clippers according to the manufacturer’s instructions. Turn off and disconnect the clipper before cleaning or inspecting the blades.
Expert Tips for Better Fades
Good fading depends on controlled cutting, consistent guard progression, and careful observation. These practical habits help beginners and experienced barbers produce cleaner results.
- Start conservatively: You can remove more hair later, but you cannot immediately restore hair that has been cut too short.
- Adjust the lever gradually: Use intermediate positions rather than jumping between fully open and fully closed.
- Use short strokes: Short passes help you focus on the guideline instead of cutting a large area.
- Flick away at the end: An outward motion helps soften the transition between lengths.
- Check both sides: Compare the height and shape of the fade regularly.
- Follow hair growth patterns: Adjust your cutting angle to account for different growth directions.
- Keep blades clean: Proper maintenance supports consistent cutting.
- Practice with one clipper: Learning the lever range on a single model makes it easier to predict the results.
The goal is not to move the lever quickly. It is to understand how much hair needs to be removed and make the smallest adjustment that achieves the desired blend.
Pros and Cons of Open and Closed Clippers
Both settings have advantages, and neither is best for every part of a haircut. Knowing their strengths helps you choose the right setting for each stage of a fade.
Open Clippers
Open clippers leave hair slightly longer, making them ideal for blending transitions and preserving length. They help soften fade lines and create a smooth, gradual finish.
Pros
- Leave more hair for blending.
- Help preserve length.
- Reduce the risk of cutting too close during early blending.
- Provide useful adjustments between guard sizes.
Cons
- May not cut close enough for a very short baseline.
- Can leave visible lines if the transition is not blended.
- Still require the correct guard and cutting technique.
Closed Clippers
Closed clippers cut hair closer to the scalp, making them useful for creating short sections and refining lower fade lines. They require careful handling to avoid cutting too much hair.
Pros
- Cut closer to the scalp.
- Help establish short sections.
- Allow precise work around lower guidelines.
- Can help refine a tight fade.
Cons
- Can remove too much hair when used carelessly.
- May create harsh lines if the technique is incorrect.
- Require care around sensitive skin and uneven areas.
For the best result, use both settings according to the area you are cutting rather than relying on one position throughout the haircut.
Troubleshooting Common Clipper Fade Problems
If your fade looks uneven, the problem may involve the guard, lever position, cutting angle, or hair growth pattern. Check the issue before making more passes.
Why Is a Dark Line Still Visible?
A dark line usually means the hair lengths above and below it have not blended fully.
Try a suitable lever position and use light strokes directly over the line. If necessary, consider whether a different guard is needed to bridge the length difference.
Why Does One Side Look Shorter?
The fade may sit at different heights on each side, or you may have used different cutting angles.
Compare both sides regularly and use consistent guard settings where appropriate. Avoid cutting more hair simply to make one side match the other without checking the overall shape.
Why Does the Fade Look Patchy?
Patchiness can happen when you remove too much hair in certain areas or miss hair growing in another direction.
Comb the hair, inspect it in good lighting, and use careful, limited passes to correct the uneven sections.
Why Are the Clippers Not Cutting Evenly?
Hair buildup, a low battery, poor lubrication, or blade alignment problems can affect cutting performance.
Turn off the clipper before inspecting it. Clean and maintain the blades according to the manufacturer’s instructions, and seek professional servicing if the problem continues.
What If You Cannot Tell Whether the Lever Is Open or Closed?
Check the clipper’s manual or model markings. Many adjustable clippers use a down position for open and an up position for closed, but this can vary by design.
Confirm the settings before cutting so you know whether the lever will leave more hair or cut closer.
How to Practice Open and Closed Clipper Settings
Practice helps you understand how much the lever changes the cutting length on your specific clipper. Start with small sections and compare the results before attempting a complete fade.
- Attach a guard and cut a small section with the lever closed.
- Open the lever without changing the guard.
- Compare the lengths in the two sections.
- Move the lever to a middle position and compare again.
- Practice blending the boundary with light, outward flicking strokes.
- Repeat with another guard to learn how the lever and guard work together.
Use a mannequin or another suitable practice area rather than repeatedly cutting the same small patch of your own hair. This helps you learn the technique without accidentally creating a bald spot.
Open vs Closed Clippers: The Complete Guide to Better Fades
Open and closed clippers give you control over how much hair the blades remove. Open settings generally leave hair longer, while closed settings cut closer to the scalp.
Learning to use both positions, along with suitable guards and controlled strokes, makes it easier to blend different lengths and create smoother fades. Practice small adjustments, check your work from different angles, and avoid cutting more hair than necessary.
The basic rule is simple: open for longer, closed for shorter, and intermediate settings for blending.
Frequently Asked Questions
What does open clippers mean?
Open clippers have the taper lever in the position that generally leaves more hair. Barbers use this setting to preserve length, blend transitions, and soften guidelines during a fade.
Is a closed clipper better for a fade?
A closed clipper is useful for creating short sections and refining lower guidelines, but it is not better for every step. A smooth fade usually requires both open and closed settings.
Can you fade hair with the lever open?
Yes. An open lever is useful for blending and working through longer transition areas. You may still need closed and intermediate settings to remove lines and create a gradual change in length.
Should beginners start with open or closed clippers?
Beginners should use a conservative cutting plan and avoid removing too much hair at once. An open setting can help preserve length, while a closed setting is useful when a closer cut is intended.
Why do barbers keep moving the clipper lever?
Barbers move the lever to make small changes in cutting length. These adjustments help blend different sections of hair and reduce visible lines without changing guards after every pass.
Does opening the clipper lever make it cut longer?
Yes. On most adjustable hair clippers, opening the taper lever increases the length left by the blade or guard. The exact amount depends on the clipper model and blade adjustment.